
Get Started with Ansible – The Learners Way
Ansible is the simplest way to automate apps and IT infrastructure. Application Deployment + Configuration Management + Continuous Delivery.
For a better understanding of how ansible works, refer https://www.ansible.com/overview/how-ansible-works
Prerequisites
- A Linux Machine ( Prefer a Debian flavour )
- Docker
We are planning to build ssh enabled containers, and practice Ansible on those containers.
Build Docker containers
We can select ubuntu latest container as base and then install openssh server. For that create a new directory.
mkdir ~/ubuntu-ssh
Create a file named ‘Dockerfile’ in the directory and the bellow code.
FROM ubuntu:latest
RUN apt-get update && apt-get install -y openssh-server
RUN mkdir /var/run/sshd
RUN echo 'root:kefh1' | chpasswd
RUN echo 'PermitRootLogin yes' >> /etc/ssh/sshd_config
RUN ln -s/usr/bin/python`which python3`
# SSH login fix. Otherwise user is kicked off after login
RUN sed 's@session\s*required\s*pam_loginuid.so@session optional pam_loginuid.so@g' -i /etc/pam.d/sshd
ENV NOTVISIBLE "in users profile"
RUN echo "export VISIBLE=now" >> /etc/profile
EXPOSE 22
CMD ["/usr/sbin/sshd", "-D"]
Note: We should have python binary available in /usr/bin/python in the host machines in order ansible to work.
Once Dockerfile is created, issue the below command to build a ubuntu container with ssh.
sudo docker build -t ubuntu-ssh
We have built a Ubuntu container with tag ubuntu-ssh, Now we need to run 3 containers form the built image to practice ansible
Run three containers with built image.
We have an ubuntu docker image with SSH enable, Let’s spin up 3 containers from that.
docker run --name ubuntu1 -d ubuntu-ssh
docker run --name ubuntu2 -d ubuntu-ssh
docker run --name ubuntu3 -d ubuntu-ssh
We have started 3 ubuntu containers with name as ubuntu1, ubuntu2, and ubuntu3. To confirm issue the ‘docker ps’, It should list all running containers.
sudo docker ps

We need to find the IP address of the containers. to find the IP address of containers, use docker inspect command.
docker inspect ubuntu1 | grep '"IPAddress"'
The above command will show you the IP Address of the container.

Do the same for ubuntu2, and ubuntu2 containers, and note down the respective IP address. For me, the IP address was as follows.
ubuntu1 – 172.17.0.2
ubuntu2 – 172.17.0.3
ubuntu3 – 172.17.0.4
Now, Let’s connect to the hosts with ssh. root password is “kefh1”, Which is given in the Dockerfile.
ssh [email protected]
If the password login is working, we need to configure key-based login because ansible communicates to hosts with ssh and having key-based login in better. Create a new key with the ‘ssh-keygen’ command. Then enter a name for the key ( I gave ubuntu as key name )
ssh-keygen

We can see two files created, ‘ubuntu’ and ‘ubuntu.pub’. We need to copy the key file to 3 of our hosts.
ssh-copy-id -i ubuntu.pub [email protected]
It will ask you for the password, once done it will show a success message. Confirm key based login is working or not with below command.
ssh -i ubuntu [email protected]
If you are able to log in, do the same for other hosts. Use the same ssh key for all the hosts.
ssh-copy-id -i ubuntu.pub  [email protected]

ssh-copy-id -i ubuntu.pub  [email protected]
Check the key based SSH log-in to the hosts.
We are done with building infrastructure to practice Ansible. In case you need to take a break or your laptop/desktop is restarted the Docker containers will stop. So, to start the containers again issue the following commands.
sudo docker start ubunutu1
sudo docker start ubunutu2
sudo docker start ubunutu3
Let’s get started with Ansible.
Ansible Inventory files
The Ansible inventory file defines the hosts and groups of hosts upon which commands, modules, and tasks in a playbook operate. The file can be in one of many formats depending on your Ansible environment and plugins. The default location for the inventory file is /etc/ansible/hosts.
If necessary, you can also create project-specific inventory files in alternate locations. You can specify a different inventory file using the -i option on the command line.
Refer https://docs.ansible.com/ansible/2.3/intro_inventory.html for more details about Ansible inventory
Let’s create our own inventory file, let’s get started with creating a new directory for our first ansible project.
mkdir ~/ansible
cd ~/ansible
Once you are in ‘ansible’ directory, create a new file named ‘hosts’ and let’s add our docker container hosts there.
[webservers]
 172.17.0.2
 172.17.0.3

 [dbservers]
 172.17.0.4

 [webservers:vars]
 ansible_ssh_user=root
 ansible_ssh_private_key_file=ubuntu

 [dbservers:vars]
 ansible_ssh_user=root
 ansible_ssh_private_key_file=ubuntu
We have created our inventory file, here value of the ‘ansible_ssh_private_key_file’ is the relative path of the SSH Key file we have created before, mention the actual path there or copy the key file to ‘ansible’ directory.
Let’s give a ping to hosts.
This is NOT ICMP ping, this is just a trivial test module that requires Python on the remote-node. So let’s try to connect to host, verify a usable python and return ‘pong’ on success
ansible -i hosts all -m ping

Here, -i is to use our custom inventory file, and all means use all hosts mentioned in the inventory file. If you need to ping to a group of servers only mention group name instead.
ansible -i hosts webservers -m ping
              or
ansible -i hosts dbservers -m ping
Yeah, We have successfully connected to three of our hosts with Ansible.
Ansible Playbook
Ansible playbooks are the basis for really simple configuration management and multi-machine deployment system.
Playbooks can declare configurations, but they can also orchestrate steps of any manual ordered process, even as different steps must bounce back and forth between sets of machines in particular orders. They can launch tasks synchronously or asynchronously.
Let’s install Apache2 in webservers and MariaDB in dbservsers. For that create a yml file, you can give any name for the file, here I’m creating ‘servers.yml’ file. add the below code in the yml file created.
---
- hosts: all

  tasks:
    - name: Run apt update
      apt: update_cache=yes


- hosts: webservers
  tasks:
    - name: Apache | Install Apache
      apt: pkg={{ item }} state=installed
      with_items:
        - apache2

- hosts: dbservers
  tasks:
    - name: MySQL | Install MySQL
      apt: pkg={{ item }} state=installed
      with_items:
        - mariadb-server
We have created our first Ansible playbook. Let’s provision our servers with Ansible now.
ansible-playbook -i hosts servers.yml
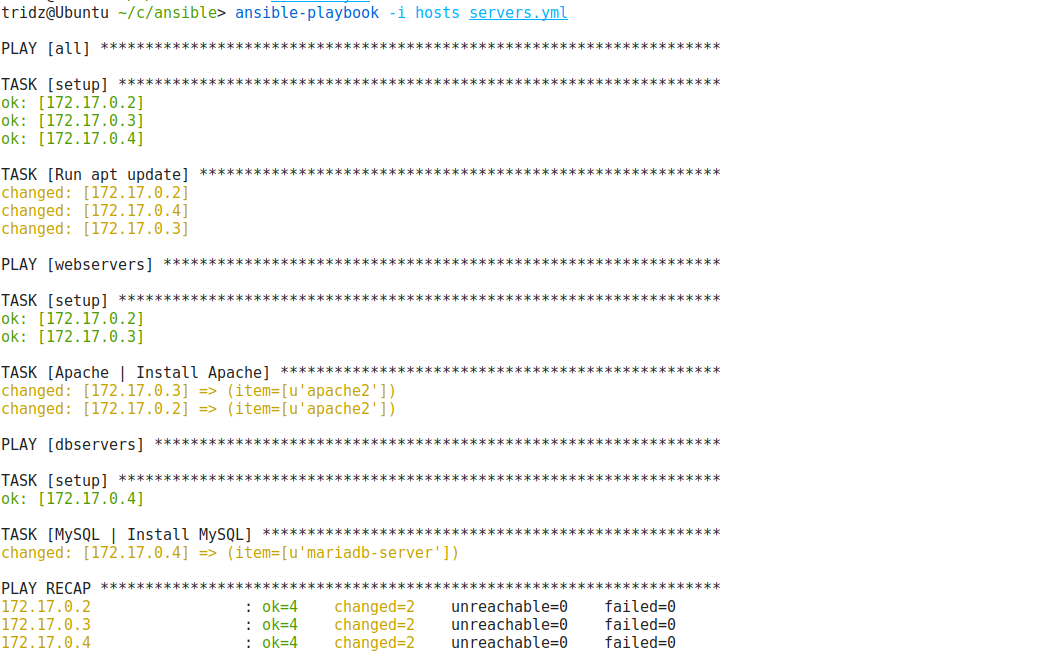
From our playbook, it will perform apt update on all hosts, install Apache webserver in two webservers hosts, and install MariaDB in dbservers.
Now login to docker hosts and confirm mentioned tasks are done.
Yeah, It’s that easy.
Playbook for setting up a LAMP stack is given bellow, give a try your self. Keep Learning. !
---
- hosts: webservers

  tasks:
    - name: Run apt update
      apt: update_cache=yes

    - name: PHP | install php packages
      apt: pkg={{ item }} state=installed
      with_items:
       - php-fpm
       - php-cli
       - php-common
       - php-curl
       - php-json
       - php-gd
       - php-mbstring
       - php-mysql
       - php-xmlrpc
       - php-opcache
       - php-intl
       - php-bz2
       - php-xml
       - php-memcache
       - libapache2-mod-php
    - name: MySQL | Install MySQL
      apt: pkg={{ item }} state=installed
      with_items:
       - mariadb-server

    - name: Apache | Install Apache
      apt: pkg={{ item }} state=installed
      with_items:
       - apache2
    - name: Apache | Enable rewrite module
      shell: >
        a2enmod rewrite

    - name: Start services | Apache MariaDB
      shell: >
        /etc/init.d/apache2 start
        /etc/init.d/mysql start